Tutorial: a gallery installation
Build a complete project from scratch with the simulator - two projectors and a media player, automations that start and stop the room on a schedule, and a dashboard for the staff.
This tutorial builds a real project from an empty page: a small gallery with two projectors and a media player, which starts by itself at 10:00, stops at 18:00, and has a touch panel for the staff. It takes about 45 minutes and needs no hardware: the Tangle simulator plays the three devices, speaking their real protocols on real network ports.
Quick start shows the parts of Tangle in 15 minutes. This tutorial goes further and explains why each step is done the way it is, so you can plan your own installations the same way.
The installation
The gallery has:
| Device | What it does | In the simulator |
|---|---|---|
| Left projector | PJLink projector on the left wall | pjlink, TCP 4352 |
| Right projector | PJLink projector on the right wall | pjlink, TCP 4353 |
| Media player | VLC playing a playlist of three videos (Intro, Loop, Credits) | videolan.vlc.player, TCP 8080, password secret |
What the client asked for:
- Every day at 10:00 the projectors turn on, and the video starts once they are warm.
- At 18:00 the video stops and the projectors turn off.
- The staff have a tablet with Start and Stop buttons, and the controls of each device for the odd problem.
- A wrong press on Stop must not close the room in front of visitors.
You will build it in this order, which works for any project:
- Devices first. Put each device in a room, connect it and check its status. Everything else refers to devices.
- Automations next. Write what the room does (start, stop) once, as automations. Schedules and buttons then call the same automation, so the room always starts the same way.
- The dashboard last. Its buttons run the automations, and its device controls are generated from the drivers.
1. Start the simulator
The simulator comes with the release (see Simulator): the tangle-sim executable (on macOS, in the Tangle .dmg next to Tangle.app) or the tangle-simulator package for Node.js 20 or later.
Make an empty folder for the tutorial, open a terminal in it and start the simulator with no configuration:
./tangle-sim run # or: node tangle-sim.mjs runIt starts with no devices, creates tangle-sim.json in the folder and opens its web UI at http://127.0.0.1:4380.
Add the three devices
In the simulator's web UI, click Add device and add each device. The form asks for a Type, an ID, a Name, a Port and the settings of the type:
| Type | ID | Name | Port | Settings |
|---|---|---|---|---|
pjlink | pj-left | Left projector | 4352 | Warm-up seconds 8 |
pjlink | pj-right | Right projector | 4353 | Warm-up seconds 8 |
videolan.vlc.player | player | Media player | 8080 | Password secret |
Each Add is saved to tangle-sim.json. To skip the form, stop the simulator (Ctrl+C), replace the file with this and start it again:
{
  "devices": [
    { "id": "pj-left", "type": "pjlink", "name": "Left projector", "port": 4352, "warmSeconds": 8 },
    { "id": "pj-right", "type": "pjlink", "name": "Right projector", "port": 4353, "warmSeconds": 8 },
    { "id": "player", "type": "videolan.vlc.player", "name": "Media player", "port": 8080, "password": "secret" }
  ]
}
The web UI shows a card per device with its live state (the projectors' power and input, the player's state and current item) and buttons to cause faults. Keep it open in a browser tab: you will watch the devices react there.
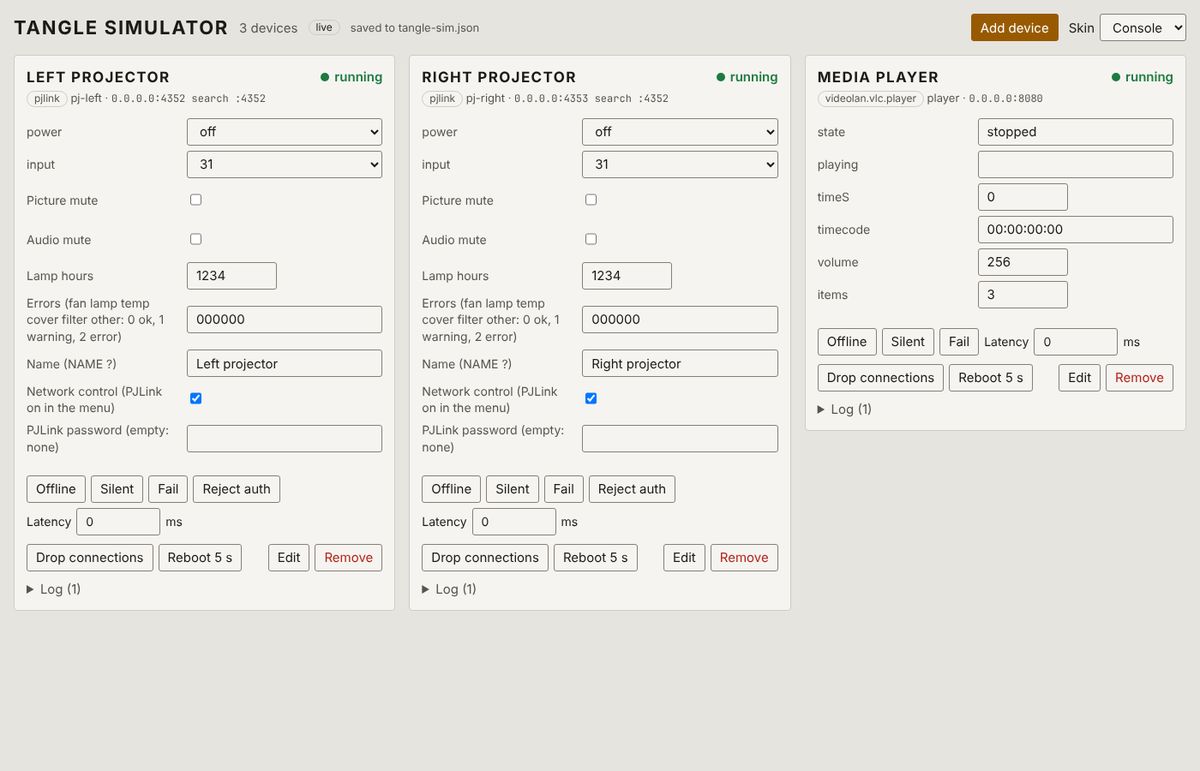
Note: A real projector takes 30 to 60 seconds to warm up. The simulator's 8 seconds keeps the tutorial short while still showing why the automation waits for it.
2. Start Tangle and make the project
With the desktop app
Open Tangle. It starts its own core, signs you in and opens the designer. The drivers bundled with the app are ready to install from the designer.
With the core service
Put the module packages you need (here misc.pjlink.projector and videolan.vlc.player) in a folder named modules next to tangle-core, one sub-folder per module: the designer offers them for install. Then start core and create a token for the designer:
./tangle-core run
./tangle-core token create --name designer --scopes read,control,configure   # in a second terminal
Open http://127.0.0.1:7340/designer, paste the token and click Sign in.
Note: Building Tangle from source?
./start.sh --simstarts core and a simulator with its own demo devices on the same ports. Use plain./start.shwith the tutorial's simulator instead.
Create the project
Tangle keeps a library of projects on the computer.
- Click the project name at the top of the sidebar, then Open or new project….
- Click New project, type
Gallery installationand click Create and open.
An empty project opens on Start a project, a wizard that builds a project from a template in four steps (kind, questions, devices, review). Its Simple installation kind makes the same kind of project as this tutorial, with one big Start and Stop. Here you will build it by hand to see each part: click Start empty.
There is no Save step to remember: every change is saved to the project as you make it. Save as… and Export… in the project menu make copies.
3. Add a room and the devices
The room
Rooms group devices the way the building does. Automations and dashboards can then say "the Gallery" instead of listing each device, so a fourth projector added later is included without changing them.
- In the sidebar, right-click Rooms and devices and choose New room….
- Type
Galleryand click Add.
The left projector
- Right-click Gallery in the sidebar and choose Add device.
- Type the Name
Left projector. The Idleft-projectoris filled in for you: automations and the API use it, so pick names you will keep. - Driver lists only the drivers already installed. Click Driver library: find, install or share drivers…, search for
PJLinkand click Use next to PJLink projectors. Tangle asks "Install PJLink projectors? It asks for: network.": click Install. - The Settings part of the form now comes from the driver. Set host to
127.0.0.1(or the simulator machine's address). Leave port empty: it defaults to 4352. This projector has no password. - Click Create device.
The device page opens with its setup assistant, "Turn on network control": the steps a technician follows on the real projector (fixed address, PJLink on, network kept on in standby, password). The simulated projector needs none of them, so click Finish later. The assistant stays on the device page under Setup for the day the real projector arrives.
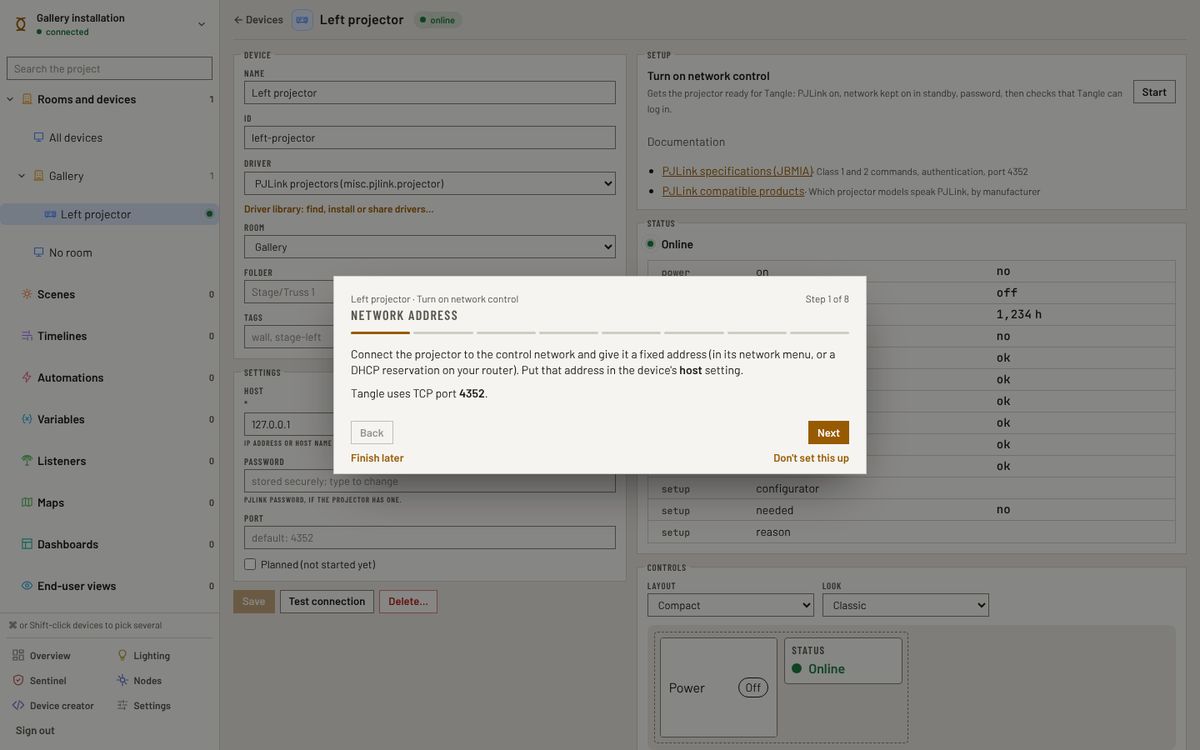
Within a few seconds the status next to the name turns online. The device page shows what Tangle knows about it:
- Status: the live state the driver reads (power, input, lamp hours, errors).
- Controls: the controls the driver offers, in a Layout (Compact, Operator, Full) and a Look. Press Power: the simulator card shows the projector warming for 8 seconds, then on. Press it again to turn it off.
- Log: every action, state change and error of this device.
Test connection checks the settings in the form without saving them, which helps when a device does not come online.
The right projector
Add it the same way: Name Right projector, Driver PJLink projectors (now in the list, since it is installed), host 127.0.0.1, port 4353.
The media player
- Add a third device in Gallery, Name
Media player. - In the Driver library, search for
VLC media playerand Use it, then Install. - Set host
127.0.0.1and passwordsecret. port defaults to 8080. - Click Create device, then Finish later on the assistant ("Turn on VLC's web interface").
Passwords are not written in the project: they go to the computer's credential store, and exports leave them out.
Click All devices in the sidebar: the three devices are listed with their driver, room and status online. This is the moment to check every device on a real site, before writing automations that depend on them.
4. Automate the start and the stop
An automation is a list of steps run in order, started by triggers (a time, a device event, a button) or by hand.
Start installation
- Right-click Automations in the sidebar and choose New automation.
- The step table starts with one Intent row. Select it: the Step 1 tab on the right edits it.
- Do: Power on.
- Target: Room, Room: Gallery.
- Tick Wait until the device reports it is done. At most stays at 120 s, and Then at "go on": a projector still warming after 2 minutes does not block the video forever.
- Click + Add step and choose Device action in the Device group.
- Device: Media player. Action: transport play.
- Open the Automation tab.
- Name:
Start installation. - Under Run when (any of), click Add trigger, choose Time of day, set At to
10:00and keep every day ticked.
- Name:
- Click Create automation.
The line above the table sums it up: "10:00 every day → Power on Gallery, then wait until done (at most 2 min), Media player: transport play".
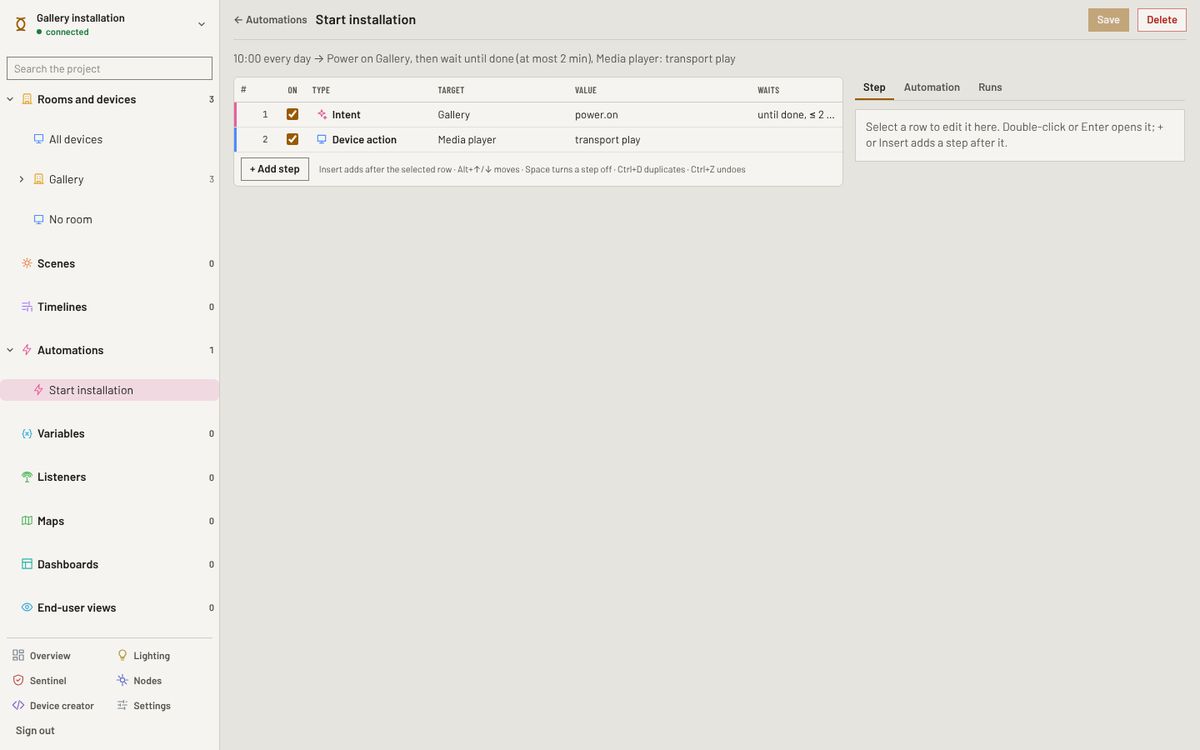
Why an intent instead of two device actions? An intent states the goal ("power on the Gallery") and each driver translates it for its device: both projectors turn on, and the media player, which has no power, is left alone. The wait until done option holds the automation until both projectors report they are on, so the video never starts on a dark wall.
Try it now instead of waiting for 10:00: open the Runs tab and click Run now. The run shows "Running: step 1" while the simulator's projectors warm up, then the player starts and the run ends as completed, after about 8 seconds.
Stop installation
Make a second automation the same way, named Stop installation:
- Device action: Media player, transport stop.
- Intent: Power off, Target Room Gallery. No need to wait here.
- Trigger: Time of day at
18:00.
Stopping the video first means visitors never see the player's desktop on a projector that is still cooling.
Tip: Behaviour in the Automation tab decides what happens when an automation starts again while it is still running (here, a second Start press during the warm-up). The default, single, ignores the second start.
5. Build the staff dashboard
Create it
- Click Dashboards in the sidebar, type
Gallery panelin New dashboard and click Create. The builder opens. - Click Save draft now and then as you work. Nothing reaches screens until you Publish.
The builder has the palette on the left, the page in the middle and the Inspector on the right. Phone, Tablet, Panel and Desktop at the top show the page at each screen size.
Title and buttons
- Drag a Label from the palette to the top of the page. In the Inspector, set Text to
Galleryand Size to Title. - Drag a Button under it. Set Label to
Start, then:- Action: Run an automation, Automation: Start installation.
- Lit when: Device state, Media player,
tangle.transport.status, lit while it is playing. The button lights up while the installation runs, wherever it was started from.
- Drag a second Button. Label
Stop, Action Run an automation, Stop installation, and Confirmation Press twice. A single wrong press only asks "Press again to confirm".
Device controls
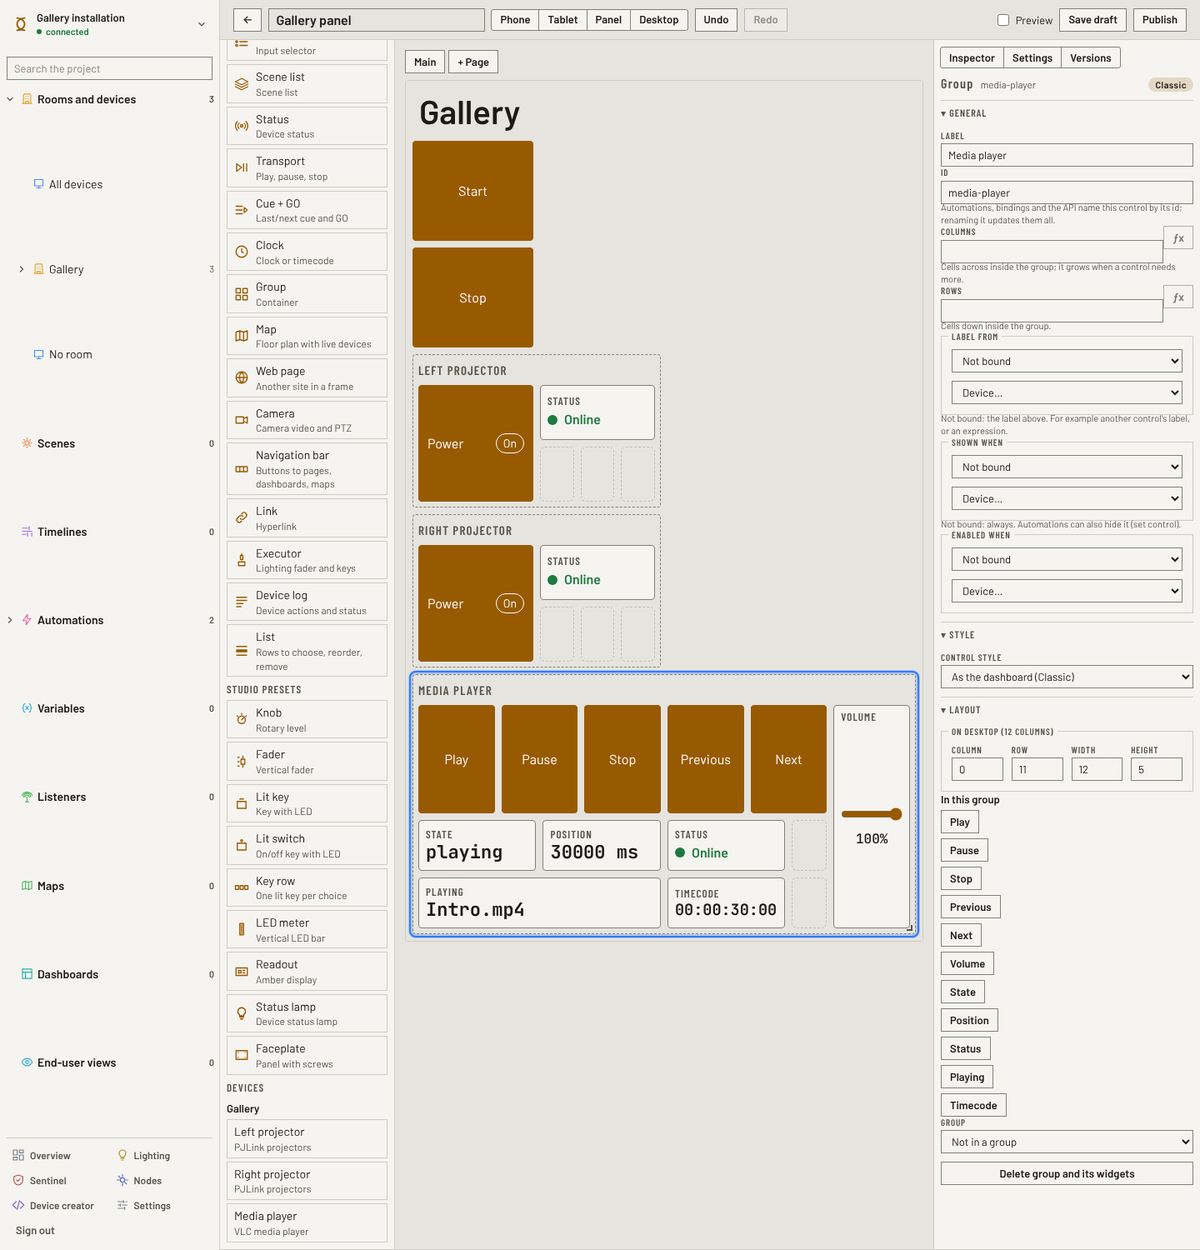
Under Devices at the bottom of the palette, click Left projector. Tangle asks which Layout to use and which controls to show: choose Compact (power and status) and click Add to page. The controls arrive as a group bound to the projector. Do the same for the Right projector, and for the Media player with the Operator layout (play, pause, stop, previous, next, volume, and what is playing).
Publish and open it
- Click Save draft, then Publish. The builder confirms "Published version 1". Screens showing the dashboard reload by themselves on each later publish.
- Open
/d/gallery-panelon your core:http://127.0.0.1:7340/d/gallery-panelwith the core service.
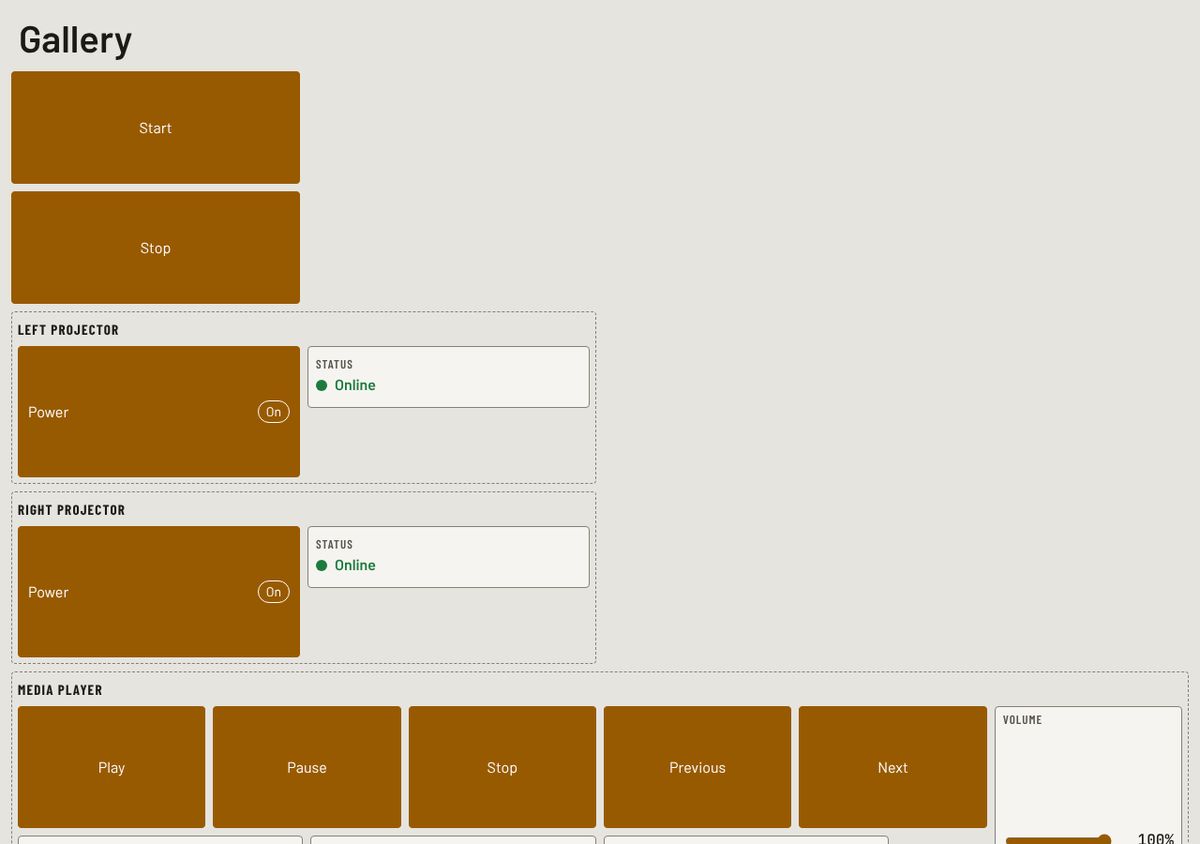
Try it:
- Press Start: the projectors warm up in the simulator, the video starts, and Start lights up.
- Press Stop once: it asks "Press again to confirm". Press again: the video stops and the projectors cool down.
To open it on the staff tablet, core must accept other machines: start it with --listen 0.0.0.0:7340 --allow-remote --insecure-http and a license or --demo, then open http://<core address>:7340/d/gallery-panel. See End-user views to give the staff a menu protected by a PIN instead of a bare address.
6. Rehearse a failure
Projects are judged on the day something breaks. The simulator lets you rehearse it:
- In the simulator's web UI, click Offline on the Right projector.
- In the designer, the Right projector turns offline in the sidebar and in All devices. The Overview lists "Right projector is offline" under Needs attention, with a Fix link to the device. On the dashboard, the projector's status turns offline.
- Press Start on the dashboard. The left projector warms up, but the run stops at step 1: an action sent to an offline device fails at once, so the video does not start. The automation's Runs tab shows the run as failed, with the step and the reason.
- Click Offline again in the simulator to bring the projector back. Tangle reconnects by itself.
Whether a half-ready room should still start is a choice for each site. To start the video anyway, tick Continue after a failed step under Behaviour in the Automation tab. At most and Then decide the other case, a device that answers but takes too long: go on, or fail the run. Sentinel (Pro and Ultimate) can also send an email or a message when a device stays offline: see Sentinel.
7. Hand it over
- Export… in the project menu writes a
.tanglefile of the project, without passwords: keep it with the site documents, or Import… it on the site's computer from the project list. - Replace the simulator by the real devices: change each device's host to the real address and run its setup assistant on site.
- Licensing explains which license the site needs. Without one, core runs as the free designer and pauses every hour.
What you learned
| Concept | Where it was used |
|---|---|
| Rooms | Automations target "the Gallery", not each device |
| Drivers and the Driver library | PJLink and VLC were installed when first used |
| Setup assistants | The steps to prepare each real device, kept for the site visit |
| Intents | "Power on" means the right thing for each device in the room |
| Wait until done | The video waits for warm projectors |
| Automations and triggers | One Start, run by the clock, a button or by hand |
| Dashboards | Buttons run automations; device groups come from the drivers |
| Confirmation | Stop needs two presses |
Next steps
- Give the video a timeline with cues: Timelines.
- Change the opening hours without editing automations, with a project variable: Automations.
- Let another system start the room over the network: Listeners.
- Add a device Tangle has no driver for: Device creator.